Quick answer: The elements of photography are the visual building blocks found in a scene — line, shape, form, texture, pattern, color, and space (many photographers also add light, depth, and perspective). The principles of photography are the rules for arranging those elements into a strong composition — balance, contrast, emphasis, proportion, rhythm (repetition), movement, and unity (harmony). Put simply: elements are what you work with, and principles are how you arrange them.
There is a saying that when you buy a camera, you’re a photographer but if you buy a guitar, then, you’re just a guitar owner. These days everyone seems to claim to be a photographer as almost everyone owns a camera in one form or another – from the smartphone owner to the enthusiast who happens to own a mirrorless or DSLR camera.
But is that all that it takes to become a real photographer, one who can muster different elements and principles in order to produce more appealing images? Photography is a form of art. As with any other forms of art, photography has elements that might not be the first thing that we think about when we take a photograph, but we need to be aware of in order to improve how our photos look and feel.
Sometimes we unconsciously utilize one or more of these elements when we compose an image. Someone with a good grasp of these elements will look for these in any particular scene no matter how plain it looks like.
Then he can use the principles of photography to organize these elements to form one striking photographic piece of art from something that looks to be just a simple subject. Even something so simple like a flower can draw a viewer’s attention if we look for these elements and apply these principles properly.
Table of Content
What Are The Elements of Photography?
These are the elements of photography:
Line
Shape
Form
Texture
Pattern
Color
Space
Composition
Light
Depth of Field
Vantage Point or Perspective
There are lots of photography elements but after you know them all you are going to start noticing them in your everyday life and your photos will start to get immensely better. Now let us start from the beginning of the list.
Line
There is definitely more to a photograph. As human beings, we are used to seeing the world in a particular way. In a photograph of a landscape scene, for example, you may see it as a couple of tall trees, a beautiful sunset, the clouds, a calm sea, the mountains, etc.
As a photographer though, you should learn how to think and see the world differently – in terms of pieces of geometry. A line is probably one of the strongest and one of the most important elements in photography or any form of art. A line is a one-dimensional representation of an object.
Everything starts with a line, and lines can make up shapes, and shapes compose form, and form composes texture, and texture composes the pattern. If you’re just a beginning photographer, it is important that you learn to see the world in terms of lines, shapes, forms, textures, and patterns. Lines can be long, short, thick, and thin.
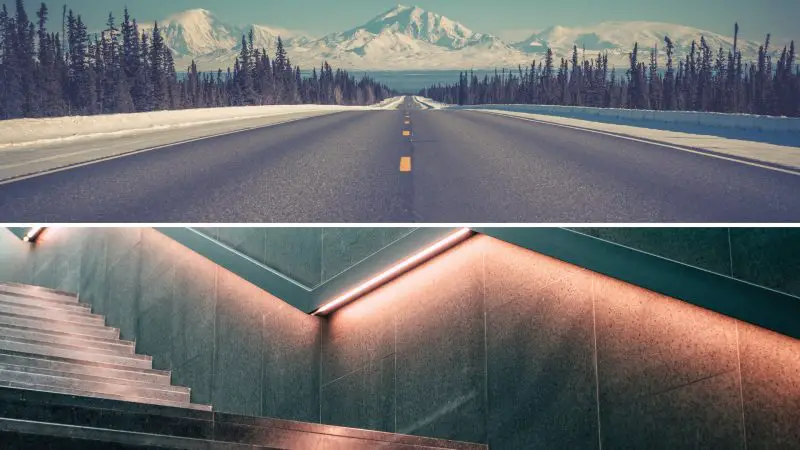
They can also go horizontal, vertical, or diagonal. They can also be straight, curvy, jagged or broken. But most importantly, lines can also cause the viewer to do something. It can lead the viewer’s eyes and guide his focus through the outlines of your subject and other key focal points in a photograph.
It can also convey emotion and mood. Thin lines, for example, evoke a feeling of weakness or fragility whereas thick lines can show a feeling of strength, boldness or stability.
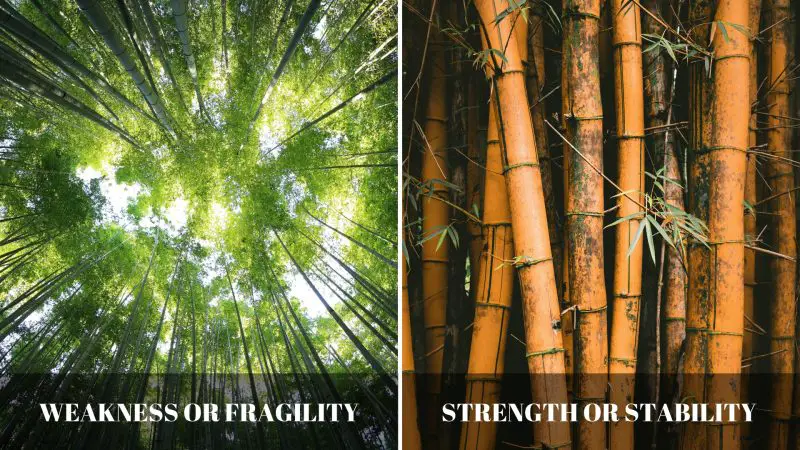
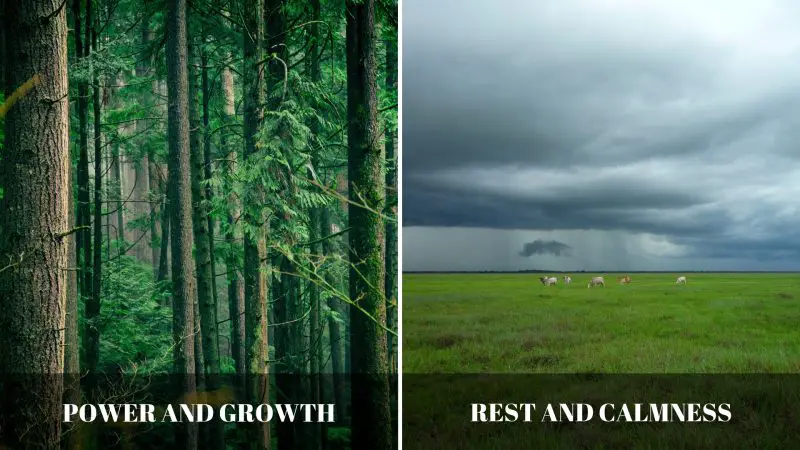
See the difference in emotion conveyed by the above different photographs with similar subjects? Horizontal lines like in the picture below evoke a sense of rest and calmness. Vertical lines, on the other hand, can convey a sense of power and growth.
Diagonal lines are used to add dynamism to an image, to convey movement or to lead the viewer’s eyes to the point of interest.
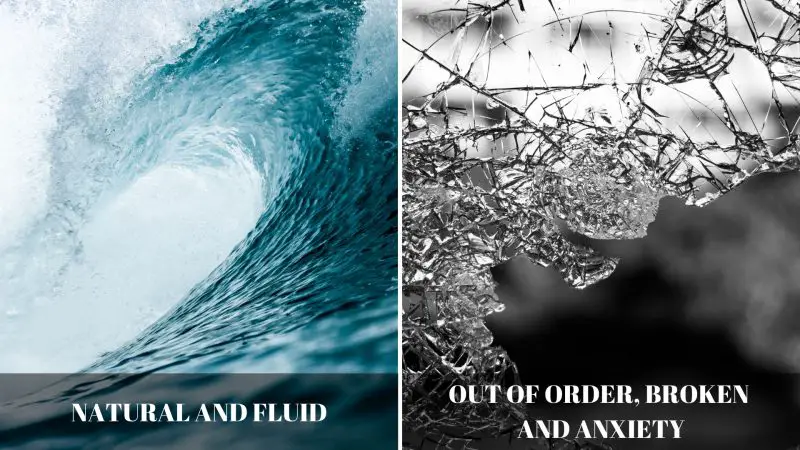
When we see curvy lines, we tend to have a feeling of things being natural, fluid or orderly like in the picture of sea waves below. On the opposite, jagged lines can evoke a feeling of chaos, being broken or out of order, or even anxiety.
See how lines can effectively communicate emotions through the above photographs? That is why lines are arguably the most powerful element in photography. Clever use of lines in an image can seize your viewer’s attention.
Shape
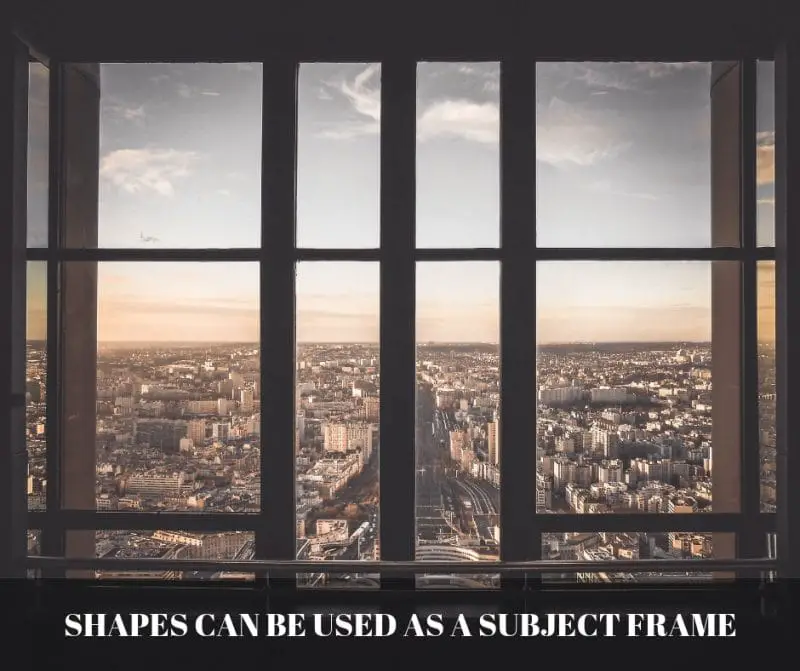
Lines that converge with each other can form shapes. It represents objects in a two-dimensional plane, and they are used in photography to create a sense of space and substance. Shapes, whether they’re rectangular, round, etc., can be used in a lot of different ways. They can be used in framing your subject, for example, as in the image below:
Shapes can also be artistically represented in the form of silhouettes through backlighting.

The photos above are great examples of representing shapes through silhouettes, and you can be very creative with your images when you use this element. Look for geometric shapes in architecture, nature, and everyday objects – once you start seeing them, they’re everywhere.
Form
If you add a third dimension or thickness to a shape, it yields form. The form is what makes a photograph appear life-like. And while photography is mostly presented in a two-dimensional plane, there are certain techniques that photographers use in order to represent form by creating an illusion of depth or thickness.
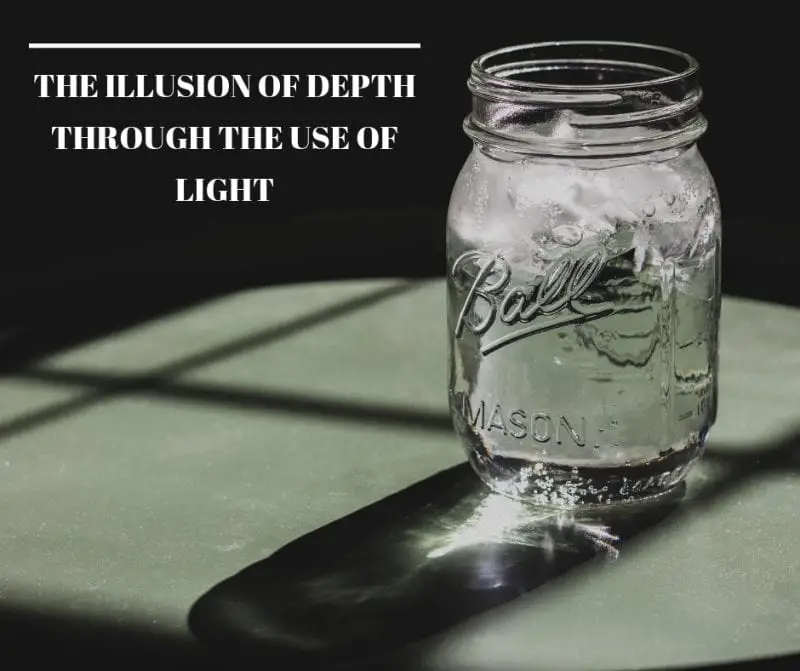
One method of creating an illusion of depth is through the use of light. Carefully controlling or placing lights onto your subject will add highlights and shadows to it in order to give it a three-dimensional look. Side lighting is especially effective for this – it rakes across surfaces and creates the contrast between lit and shadowed areas that our eyes interpret as depth.
Texture
The texture represents the details that are on the surface of a subject. Like the form, it can be a challenge to capture texture or how an object feels in a two-dimensional plane, but it can also be achieved through the use of careful lighting.
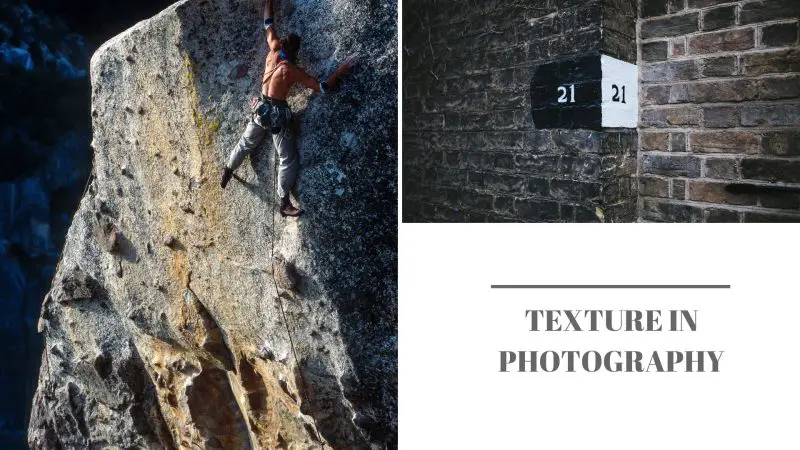
Using texture for backdrops can create images that look more alive and exciting. Rough bark, weathered stone, peeling paint, soft fur – texture gives the viewer the sense that they could reach out and touch the subject. The key to capturing it well is directional light that creates tiny shadows across the surface details.
Pattern
A pattern in art is defined as a repeated form or design. Indeed, when you create a repetition of shapes and textures, a pattern is formed. Patterns are everywhere around us so they can be aesthetically pleasing to the viewer and we usually get drawn to them rather easily. Emphasizing these patterns can produce some amazing shots.
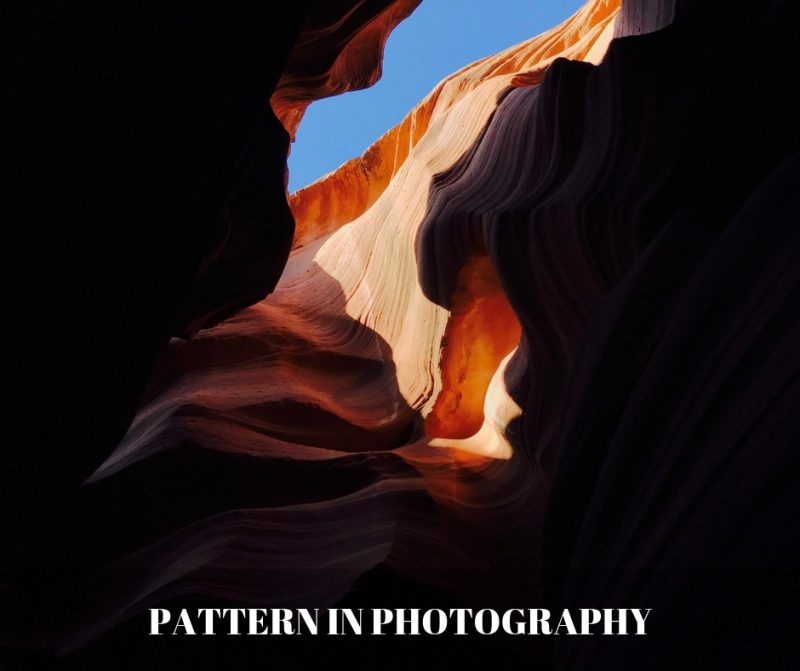
The pattern is an important element of photography as it can form rhythm and symmetry. But here’s a pro tip: breaking a pattern can be even more powerful than the pattern itself. One red door in a row of blue ones, a single person walking against a crowd – pattern interruption immediately creates a focal point.
Color
Color is defined as an aspect of the appearance of objects and light sources that may be described in terms of hue, lightness, and saturation. It enables one to differentiate otherwise identical objects and make your preferred subject pop out. It also has a major role in setting the mood in an image. Different colors can set a different mood.
Color is classified either as warm or cool. Yellow,red, and orange are warm colors, and they set up a lively, vibrant, or energetic mood to the scene. There is a reason why a lot of people love photographs of sunsets or sunrise. The warm glow gives out a happy, lively, and romantic mood.
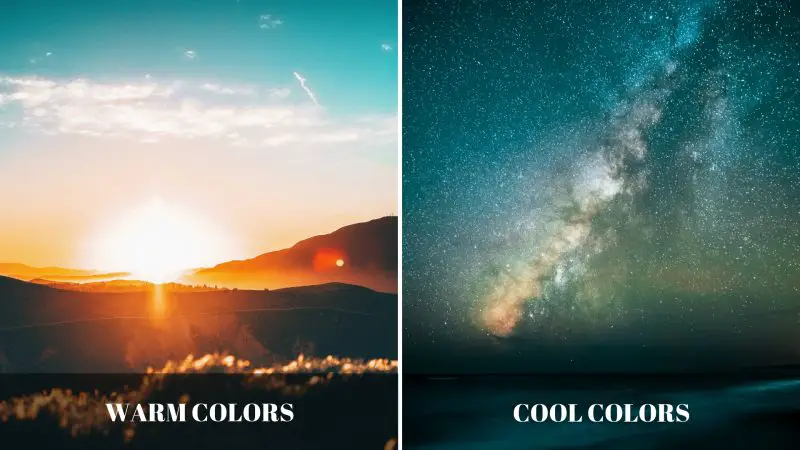
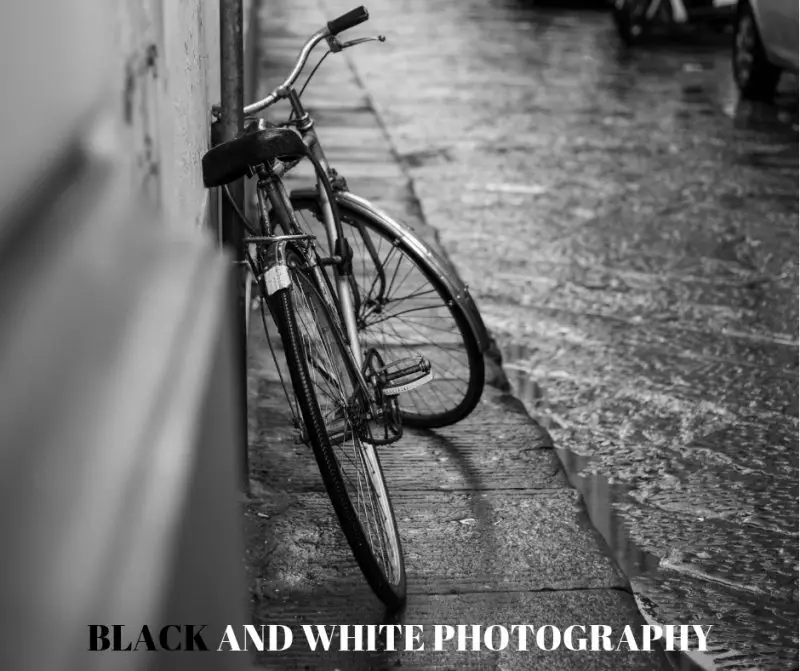
Cool colors, on the other hand, suggest a feeling of calmness, coldness, and sometimes even sadness. Blue, grey, and green colors fall into this category. Everything around us is filled with colors – nature, skies, people, houses, cities, etc. However, the absence of color or black and white images can add a dramatic impact to your photos. It can give a different emotion and a sense of timelessness to them.
Choosing the right colors in your image is something that separates the pros from the amateurs as it makes a huge difference to the emotion and mood of your photos. Understanding basic color theory – complementary colors, analogous colors, and how warm and cool tones interact – will give you a major edge in your compositions.
Space
Space is another important element of photography that also gives an image a three-dimensional feeling. It gives depth to an image and suggests the distance between different objects and perspective.
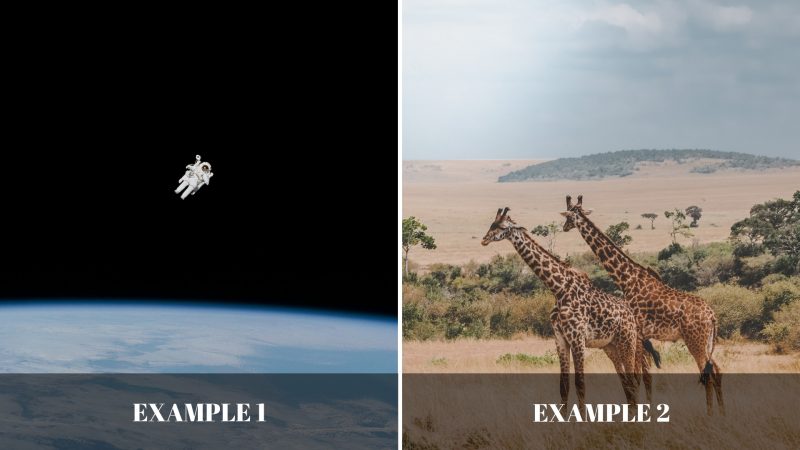
The above photo in example 1 is a good and simple use of space in an image. The “positive space” is the space taken by the subject, in this case, the astronaut. The “negative space” is the blank space taken by background and foreground. It creates a sense of being so small and distant of the astronaut from the earth.
Using space doesn’t mean it needs to be all blank like there is nothing in it. It may still contain something like on the photo in example 2. Did you notice how space can create a sense of depth in this image? The giraffes take the positive space while the negative space consists of the mountain and the sky far in the background, the plain and forest in the middle ground, and some of the grasses in the foreground.
Minimalist photography leans heavily on negative space – it isolates the subject and draws the eye with no distractions.
Composition
When we look for lines, shapes, forms, textures, and patterns in a scene that we want to shoot, we exclude the objects that we don’t want from the camera’s frame and we fill the frame with those elements we want and arrange them in a way that the subject of the photo will really stand out. This is also known as composition or framing.
In other forms of art like music or painting, artists usually start with a blank sheet or canvass and just include the elements and objects as they go on. In photography, we do the exact opposite. We already have everything in front of us, and we decide what to exclude in the frame before we take the image.
There are instances when there are certain objects in the background that you don’t want to be in the final image, so we frame those out of the composition. We then arrange the things that are in the frame in a way that makes sense to the viewer or draw his attention to the subject of the photo. When we say the arrangement of objects in a frame, we don’t arrange them as we do on flowers or your furniture at home.
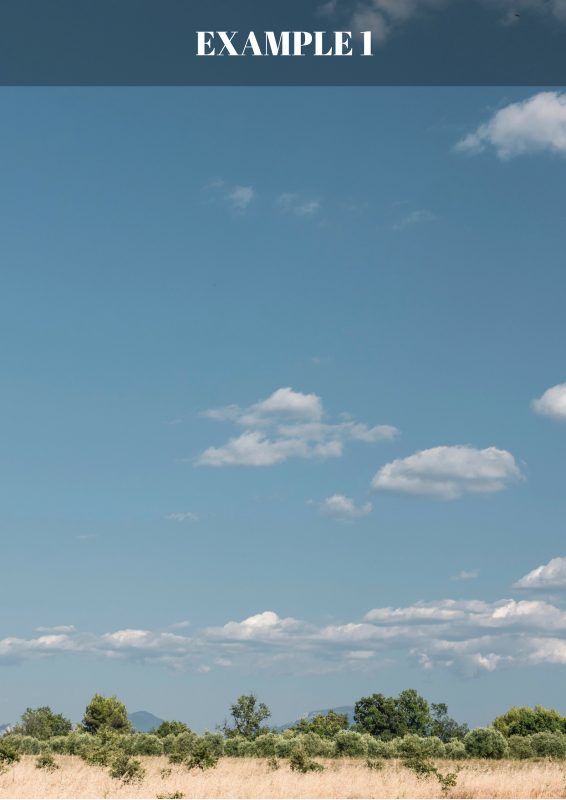
There are certain techniques that photographers use to compose good images, one of the most famous being the rule of thirds. Doing balance in a composition doesn’t always mean putting your subject in the dead center of the frame to make the left and right sides of the frame symmetrical, it doesn’t work that way in photography. Let’s take a look at the photo in example 1.
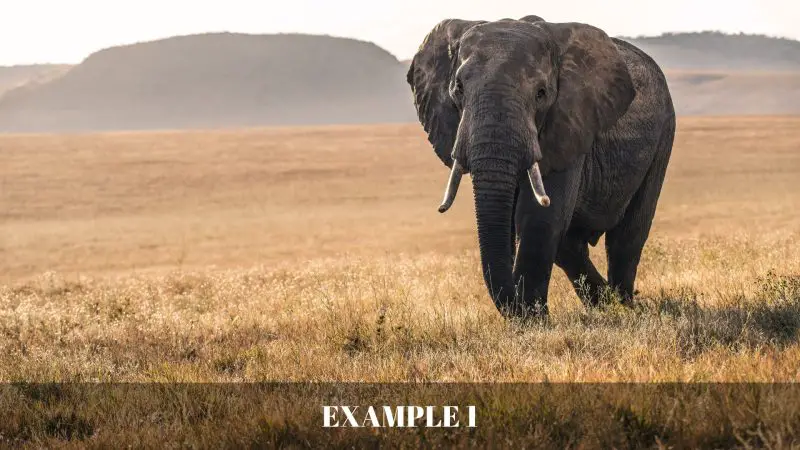
This is a balanced composition by using the rule of thirds. By definition, the rule of thirds is achieved by dividing your frame with imaginary lines into three equal parts both vertically and horizontally and then aligning your subject along these lines or their intersection points to achieve a balanced composition.
In example 1, if you imagine that there are vertical lines using the rule of thirds, the elephant crosses the second line to the right. It is not dead center, but it is also not too close to the right side of the frame. And though the main focal point of the photo is the elephant, there is ample space on the left side to give it enough space in front to walk into.
Now just imagine for a second that the elephant is on the dead center of the frame. Now you have spacing on both sides of the frame that doesn’t make too much sense. Here is another example of a photo using the rule of thirds:
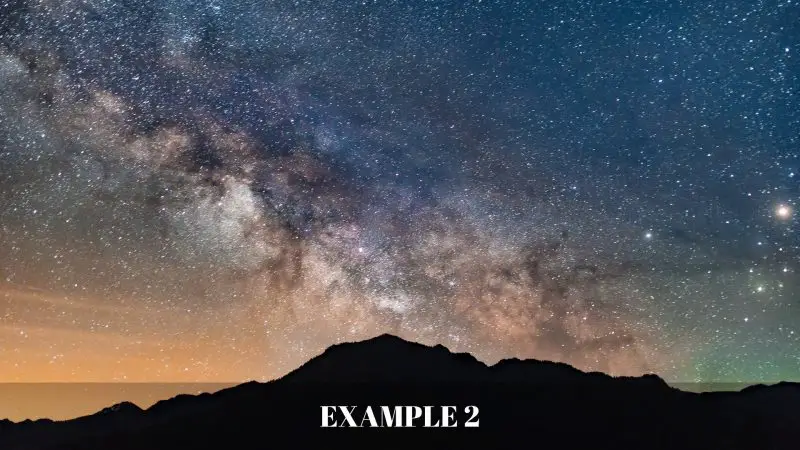
The example 2 is pretty intuitive. The focus of the image is the star-lit sky, with the silhouette of a mountain on the lower third of the frame. Again, if you compose the image so that the silhouette of the mountain is on the dead center, then you have the second half of the image that is covered in shadows that doesn’t make any sense at all, while you’re losing focus on the beautiful star-lit sky.
This is why it is important to practice the rule of thirds in photography composition, especially for beginners. Most cameras and smartphones nowadays have a grid option built into the viewfinder or screen – turn it on and use it until framing with the rule of thirds becomes second nature.
There are certain situations where the rule of thirds can be broken like when you run across photographic scenes with perfect symmetry, or you want to use more negative space to make your subject feel small. That is just one technique used in the composition.
Some other methods of composition involve using different kinds of lenses to control your field of view and depth of field, tweaking aperture on your camera, and using light to include and exclude elements in an image through selective exposure. The composition is a very broad topic and is something that takes a lot of time to learn, but once you mastered it, you learn to look at the world with keen eyes and creativity and see what compelling photos are possible.
Light
From the word itself, photography is derived from the Greek words photos which means “light” and graphe which means “drawing” so the word literally means “drawing with light” or “painting with light”. Light is one of the most important elements of photography. In the same way that we can’t see anything without light, you can’t have a photograph without light.
Controlling the light with the mechanisms present in your camera and other external factors like backlighting or front lighting determines the amount of exposure that your resulting image will have. Depending on how you control light with these tools, you can avoid having an underexposed or overexposed image.
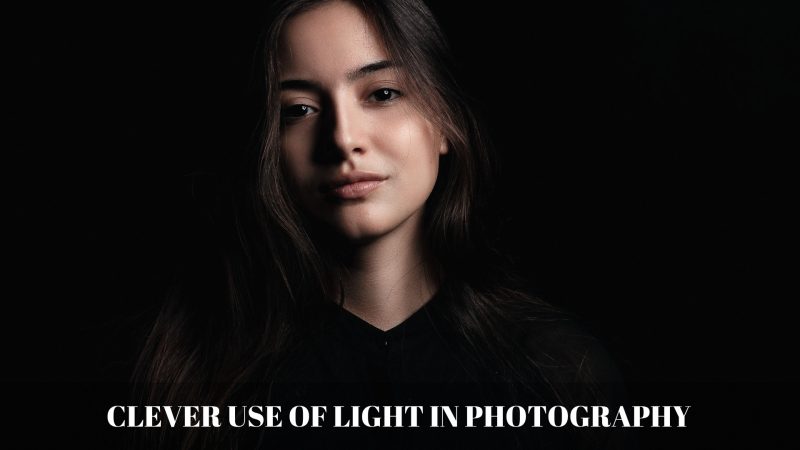
See how in the above photo the background is all dark, but the subject is composed clearly? This can only be achieved through the clever use of lighting. You can also create a form or an illusion of depth through the use of light as explained earlier.
Silhouette images can only be artistically created through the clever use of light. Pay attention to the quality of light, not just the quantity. Soft, diffused light (overcast days, window light) wraps around subjects gently and minimizes harsh shadows. Hard, direct light (midday sun, bare flash) creates strong shadows and high contrast. Neither is better – they serve different creative purposes.
Depth of Field
Most photographers aim for sharp images when they shoot. Our eyes are trained and focused to see things that are sharp. But when we focus on a particular subject, does it mean that everything in the frame needs to be sharp including the background?
This is where the depth of field comes in. The depth of field is another element that creates a sense of a photo having three-dimensions. Playing with depth of field will drastically impact the composition of your photo, and this can be done through the use of lenses with different focal lengths as well as adjusting your aperture.
Like in example 1, using a shallow depth of field, you can highlight your subject and make it stand out and remove any distractions that may be present in the background and foreground. This is commonly used in portrait and wildlife photography.
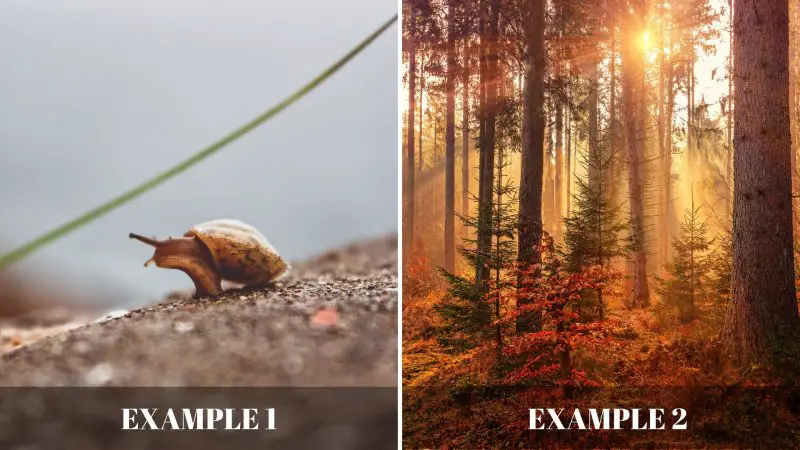
Using a wide depth of field, on the other hand, is commonly used in landscape photography (example 2), where every element present in the image, from the foreground to the background are sharp and thus leading the eye throughout the entire image.
The three factors that control depth of field are aperture (wider = shallower), focal length (longer = shallower), and distance to subject (closer = shallower). Learning to control these three variables gives you complete creative control over what’s sharp and what’s blurred in your frame.
Vantage Point or Perspective
In photograph composition, one of the habits that you need to break out of is shooting images from standing straight position. This is the most typical photographer stance, and while it’s comfortable, that vantage point or perspective is also what everyone else sees.
Shooting from a different angle like from above or down below gets you a different field of view and perspective of a scene that maybe a typical person wouldn’t see. And these are the kind of images that you should be aiming for. The vantage point or perspective can drastically change the mood of the photo, convey a different emotion, or just lets you see some more interesting things compared to taking a photo from a level vantage point or from standing straight position.
Generally, an image that is shot from a level vantage point conveys objectivity and neutrality. Typical portrait photos are shot from this position because you want your subject to be the main focus and you don’t want to take away from that. On the other hand, shooting an image up from below (example 1) makes the subject look grander and dominant. You want to shoot from this position if you want your subject to feel a little overpowering like taking a photo of a tall building.
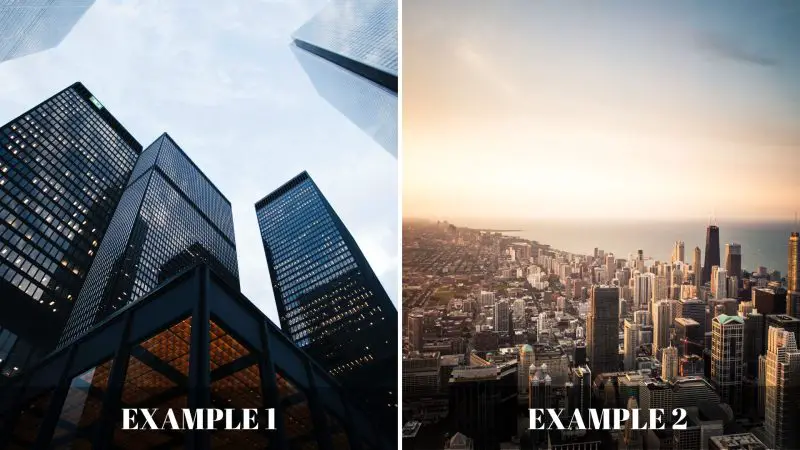
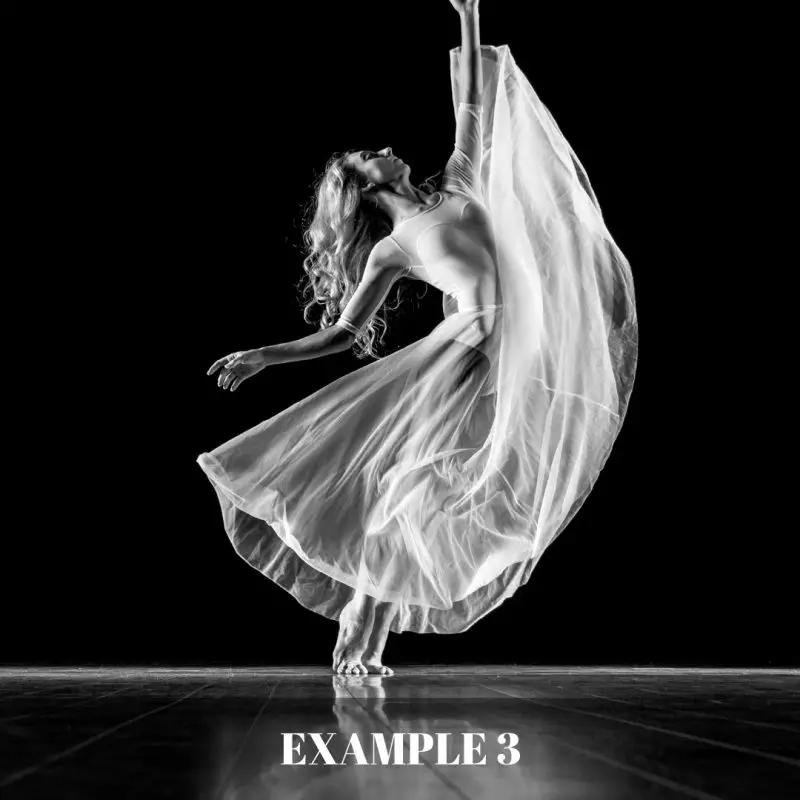
Shooting an image down from above (example 2) makes the subject feel smaller, inadequate, and weak. Shooting that same tall building from up above will make it look not as dramatic. This is why you see wedding photographs or dance photographs (example 3) that are taken from down below to make the subjects look powerful and bigger than life.
Don’t be afraid to crouch down or lie down on a sidewalk or get on a ledge up high and try moving your camera around to see a better perspective of a subject. Experimenting with different perspectives will give you some great compositions. Drone photography has opened up an entirely new vantage point – the bird’s eye view – that reveals patterns, lines, and shapes invisible from the ground.
The Principles of Photography
Below are the principles of photography that we use to arrange the elements of photography and compose them to create visually impacting photographs. Think of the elements as raw ingredients and the principles as the recipe – you need both to cook up a great image.
Unity or Harmony
Balance
Emphasis
Proportion
Contrast
Rhythm or Repetition
Movement
Unity or Harmony
We can say that unity exists when all elements in the image are in harmony or agreement. Especially when you are composing several elements, it doesn’t matter if you’re using different elements as long as each of them belongs to the composition and all these parts equal a whole.
The example photo above can be separated into parts but were unified together to form a great composition. You can achieve unity through a consistent color palette, repeating shapes, or a clear visual theme that ties everything together. When even one element feels out of place, the entire image can fall apart.
Balance
Once your eyes are trained to look for elements of a photograph, you’ll realize they are all around us. However, you don’t want to pack all of them in a single composition. So having balance in the composition is crucial to have a sense of stability and having equally spread visual weights in your image. There are three ways to achieve balance in an image:
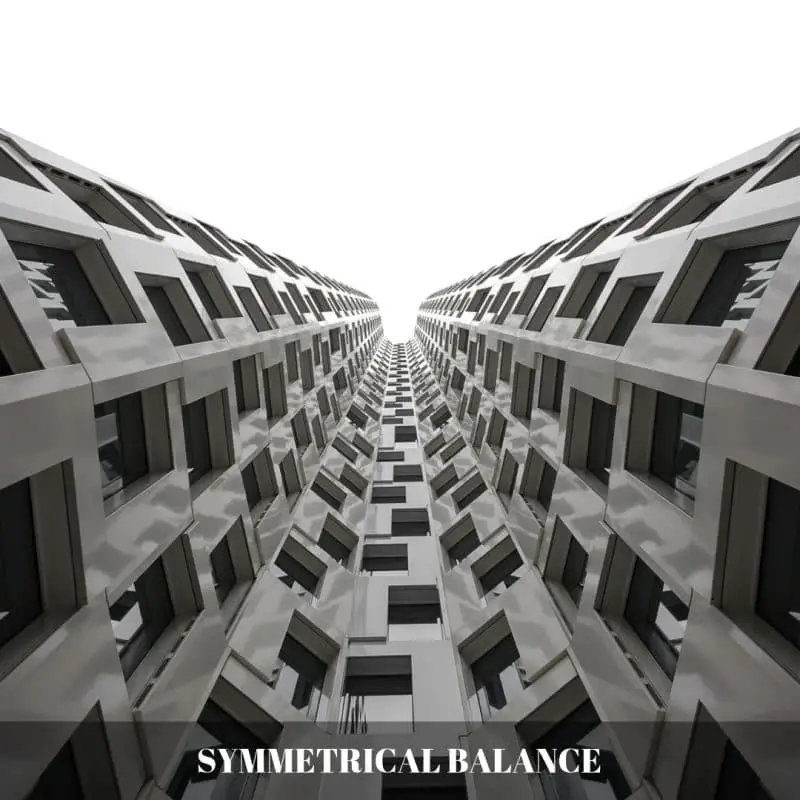
Symmetrical balance – This is also known as perfect balance. In the photo below, for example, both sides of the image have the same elements.
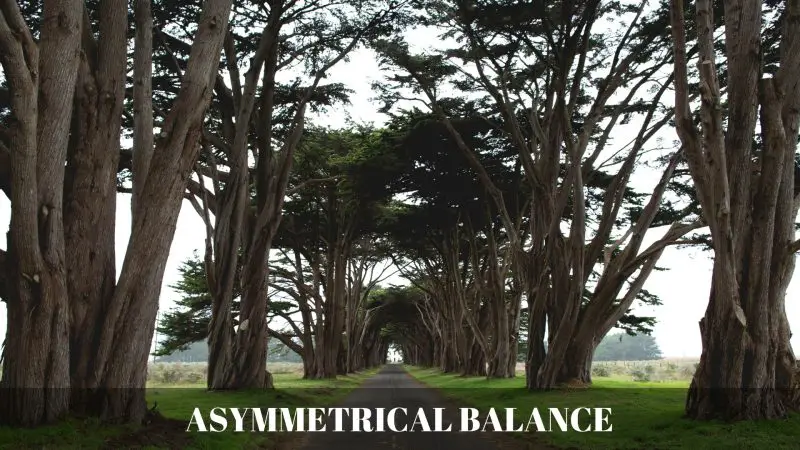
Asymmetrical balance – Balance doesn’t always mean you need to have the same elements on both sides of the composition. Sometimes a balance can be achieved by playing with shapes, colors and textures to make sure that the different elements in your image give a feeling of having the same visual weight.
Using the rule of thirds can achieve asymmetrical balance like what was discussed earlier. You can also achieve this by putting two subjects of different importance that contrasts with each other in terms of size, color, depth, etc.
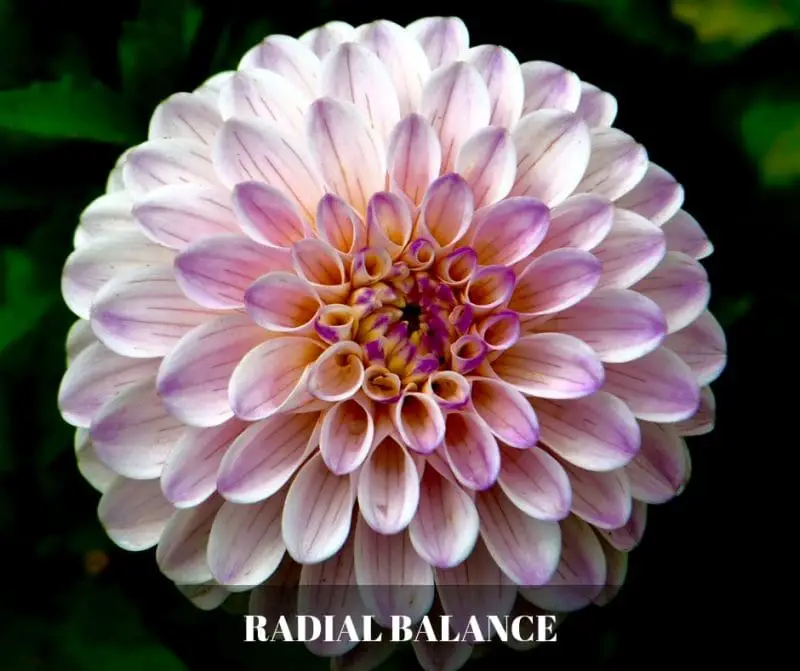
Radial balance – This is a type of balance that is based on a circle with all elements arranged around a central point like they are radiating from it. The photo below is a good example of achieving a radial balance.
Emphasis
Emphasis is used to create a sense of visual dominance to a certain element to draw the viewer’s eye to important parts of the image. This can be achieved through differences in size, depth, and color.
The photo in example 1 is using size for emphasis. The trees and grasses below were given a rather small area of the composition to emphasize the blue sky. The photo in example 2, on the other hand, achieves emphasis through depth.
Other ways to create emphasis include selective focus (shallow depth of field), color contrast (a single bright element against a muted background), and leading lines that converge on your subject. Every strong photograph has a clear focal point – if your viewer’s eye wanders without landing on something specific, the image lacks emphasis.
Proportion
Proportion or scaling is using different sizes of elements to attract the viewer’s attention to a certain subject. The photo below is a great example of using proportion to make a rather small subject look greater than life.
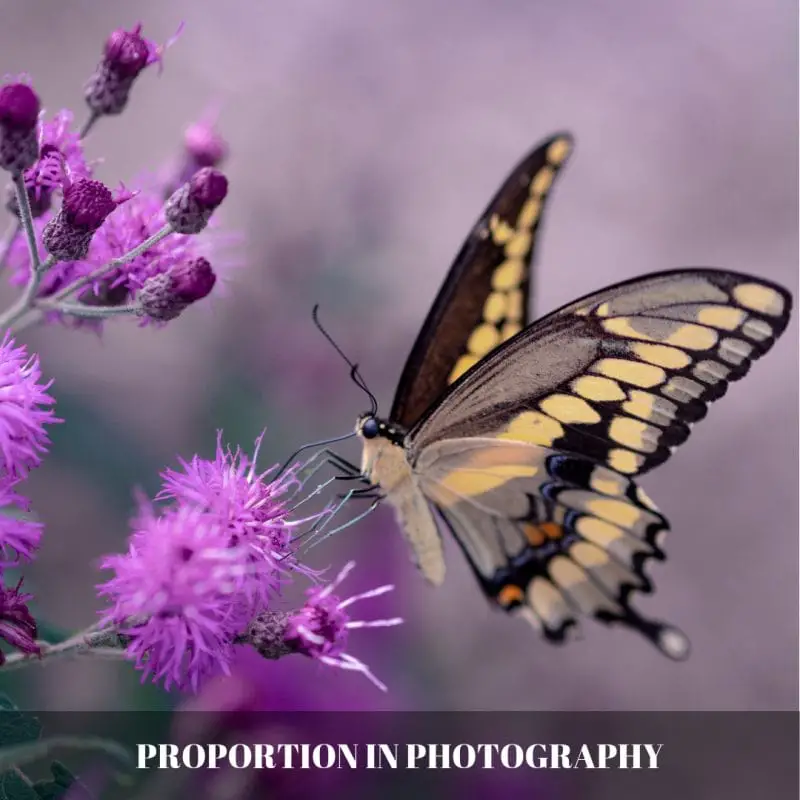
Proportion is what gives your viewer a sense of scale. A tiny person standing at the base of a cliff instantly communicates how massive that cliff is. Without that reference point, the viewer has no way of knowing. Use people, animals, cars, or other familiar objects to establish scale in your landscape and architectural photographs.
Contrast
The contrast in photography is the juxtaposition of two or more different elements with the purpose of letting one element pop out compared to another. This is easily achieved through using highlights and shadows or by using complementary colors. Silhouette images fall into this category.
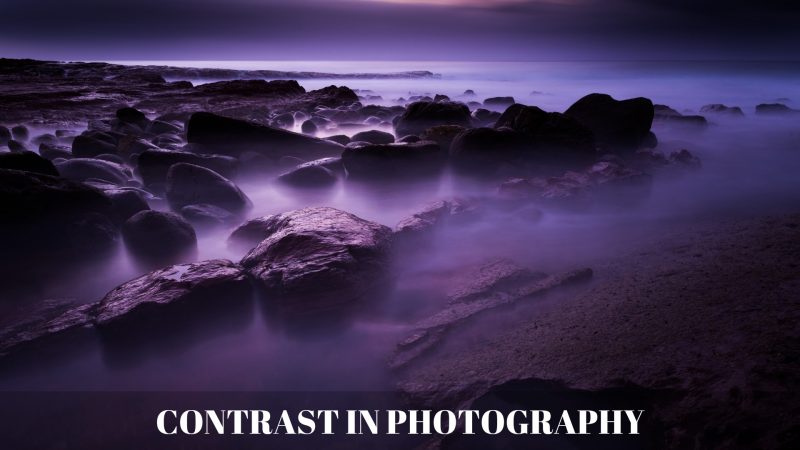
Contrast doesn’t only work in tones. You can create conceptual contrast (old vs. new, big vs. small), textural contrast (rough vs. smooth), or color contrast (warm vs. cool). High contrast images feel dramatic and bold. Low contrast images feel soft and muted. Both have their place – it depends on the story you want to tell.
Rhythm or Repetition
When an element occurs over and over again in a composition, it creates rhythm or repetition.
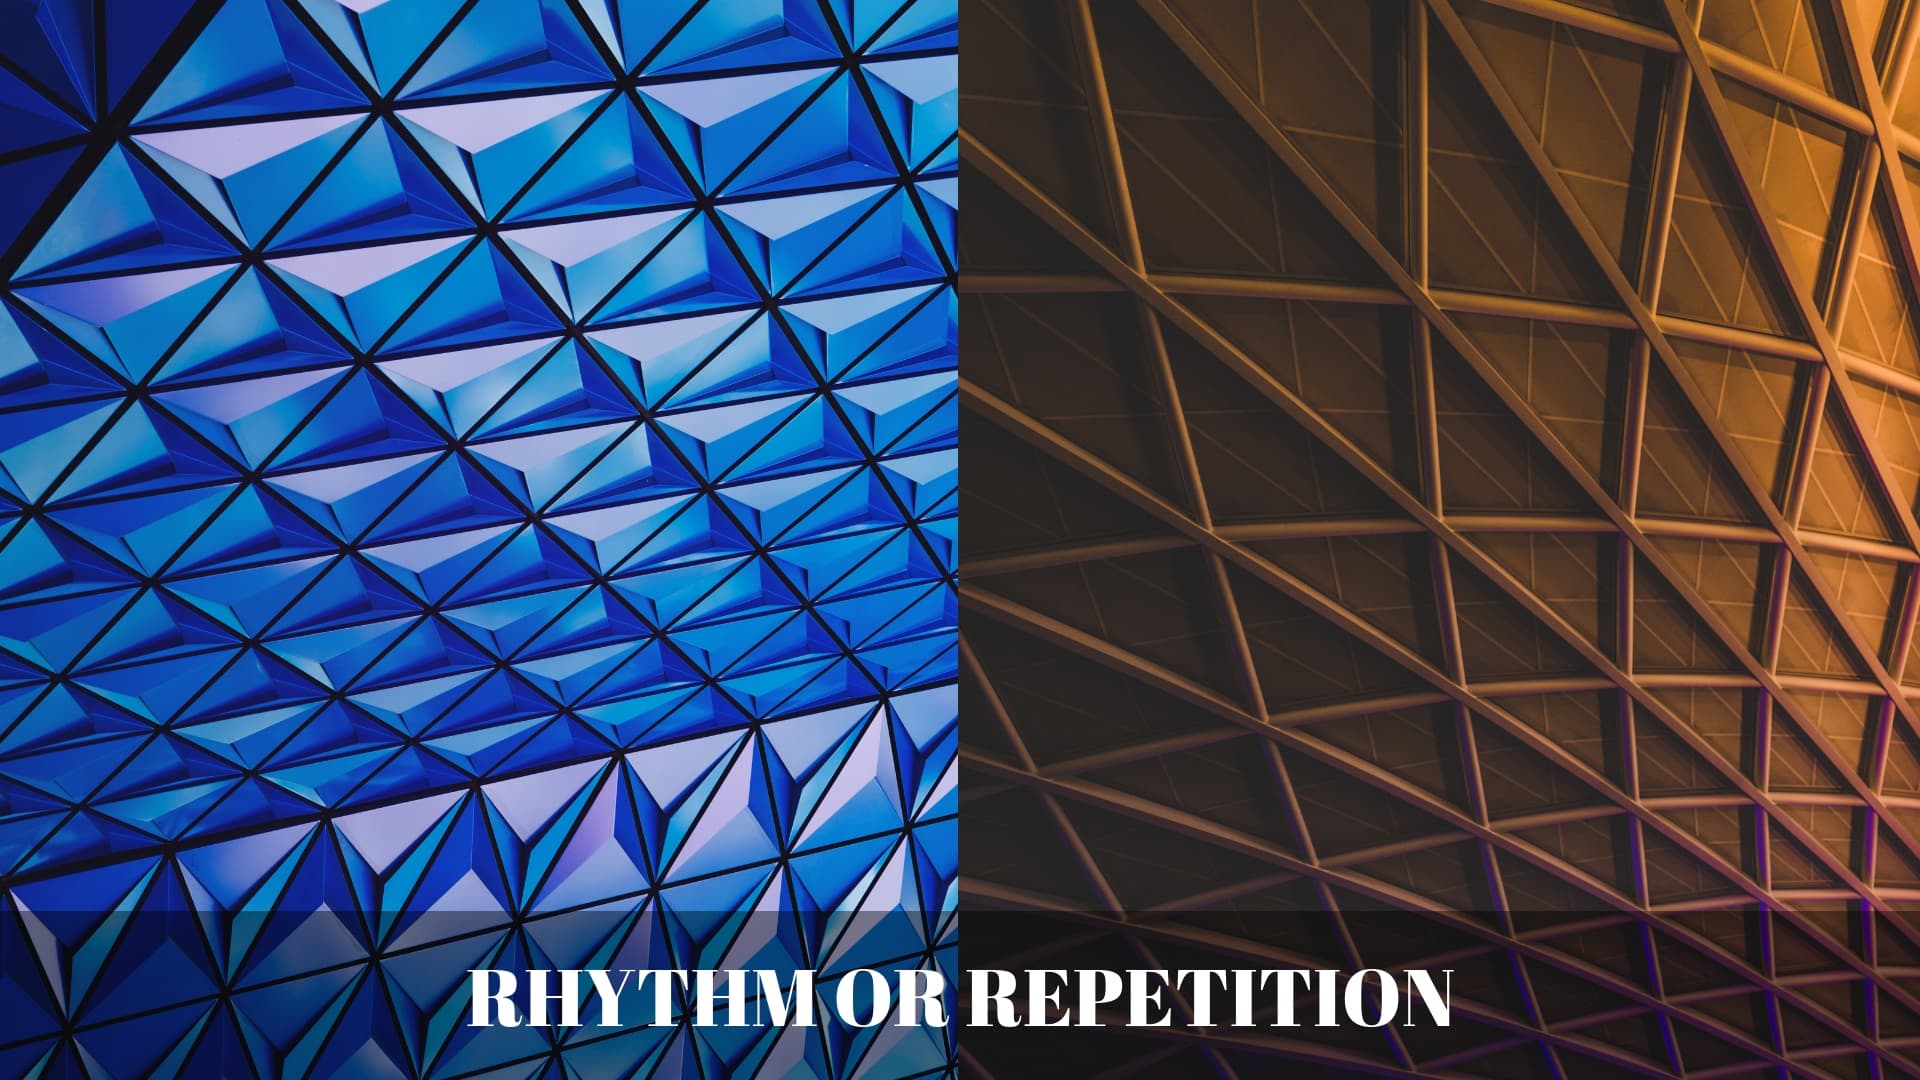
Rhythm can be regular, where identical elements are evenly spaced (like fence posts or windows on a building), or progressive, where elements gradually change in size, color, or spacing. Regular rhythm creates a sense of order and predictability. Progressive rhythm creates a feeling of acceleration or growth. Both draw the eye through the image in a natural, flowing way.
Movement
Movement is leading the viewer’s eye through your photo onto a certain focal point. The photos below are great examples of achieving movement in an image:
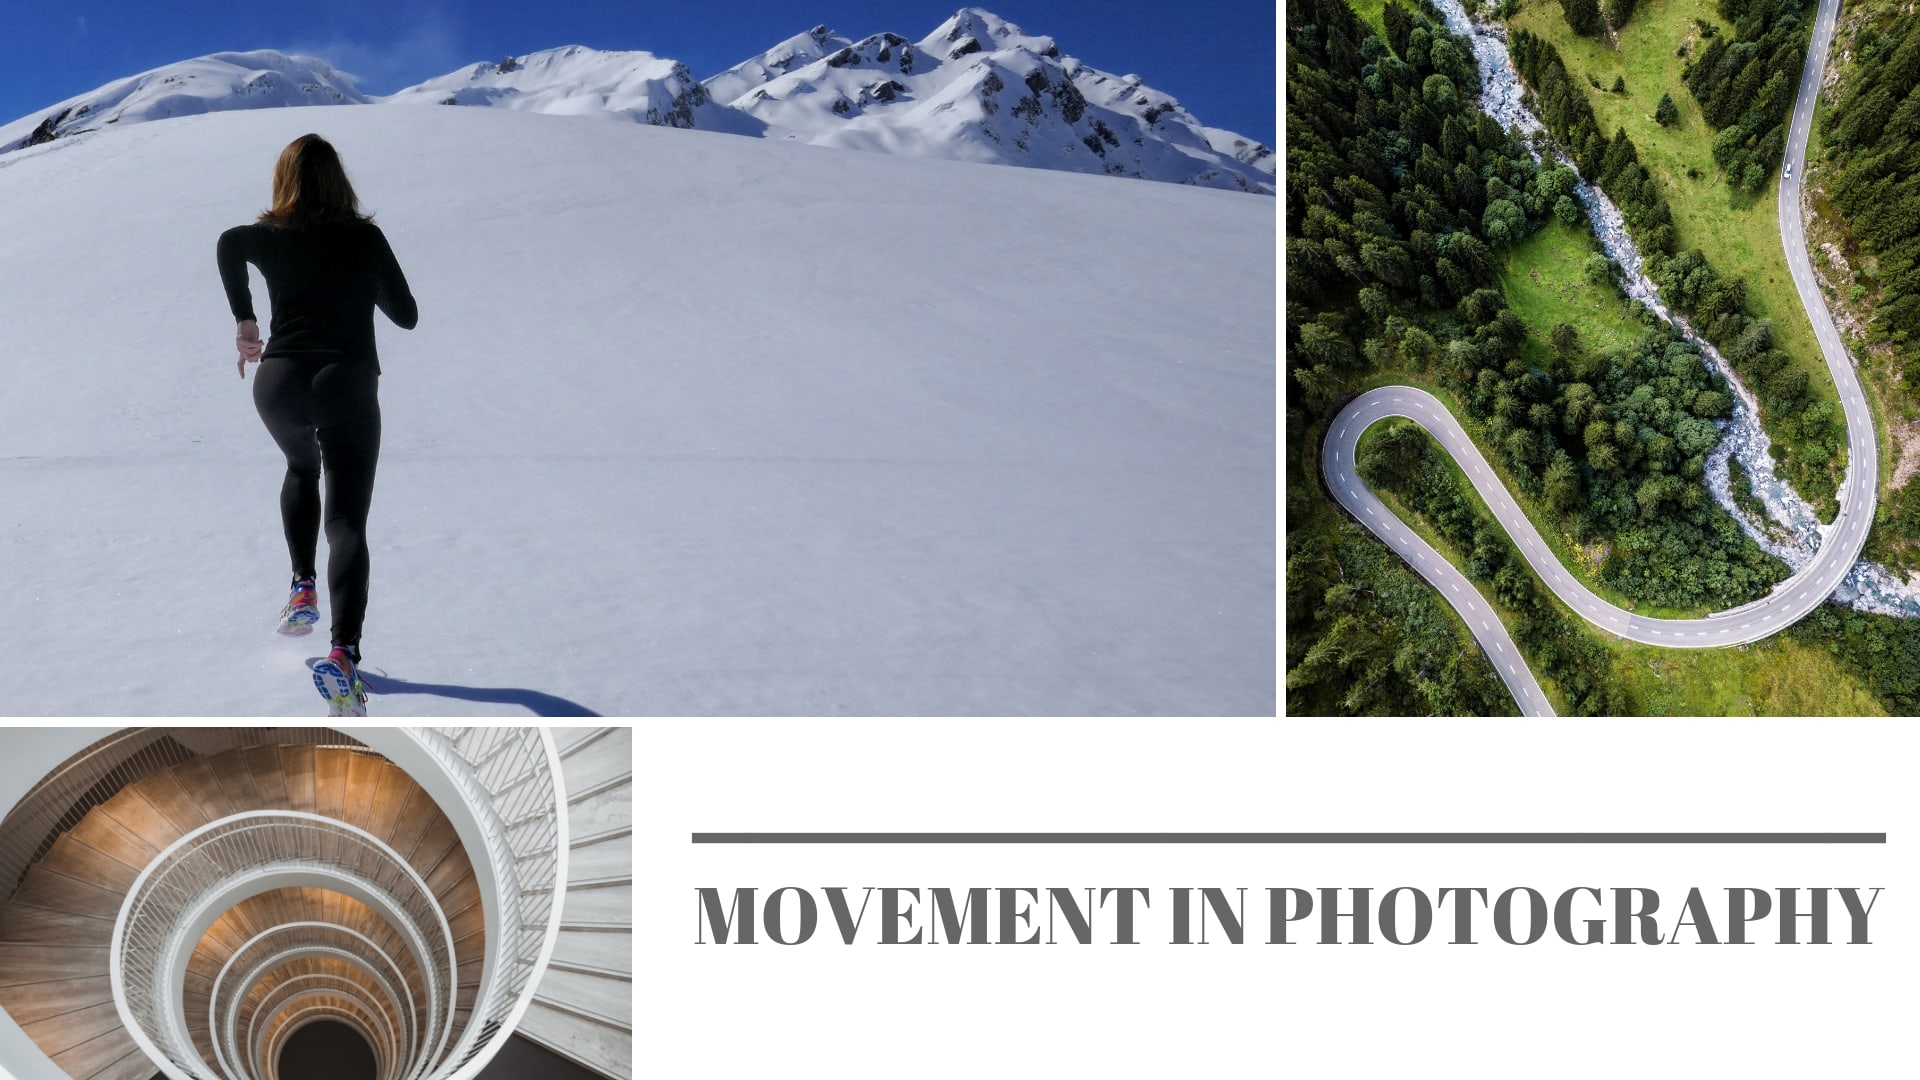
Movement can be literal – capturing motion through techniques like panning, long exposure, or motion blur – or implied, using visual cues like leading lines, the direction a subject faces, or a sequence of elements that guide the eye. A moving subject also benefits from “lead room” – empty space in front of it that gives the viewer a sense of where it’s heading.
The elements and principles of photography are what makes a photograph. Knowing how and when to use all of these will make your photos more effective and compelling. Practice makes perfect as they say and utilizing these elements and principles takes practice. Experiment with different perspectives to achieve the principles above.
When your eyes are trained to look for these elements, and you learned how to make a composition using these principles, it doesn’t matter what your subject is, just about anything can create a striking, emotion-evoking image. I also suggest reading our guide about the difference between shape and form in photography.
In-Depth Guides in This Series
This guide is the overview. To go deeper on the individual building blocks, explore our dedicated guides:
Lines in Photography — the types of lines, what they convey, and how to use leading lines to guide the eye.
Color in Photography — color theory, warm vs. cool colors, and complementary color schemes.
Texture in Photography — how side light reveals texture and the settings that keep it sharp.
Shape and Form in Photography — the difference between the two and how to use each.
Pattern in Photography — why repetition works, how to frame patterns for impact, and the trick of breaking the pattern.
Contrast in Photography — tonal, color, and conceptual contrast, and how to control it with light and editing.
Balance in Photography — visual weight, and symmetrical vs. asymmetrical balance.
Emphasis in Photography — how to give an image a clear focal point using contrast, focus, isolation, and lines.
Movement in Photography — visual flow that guides the eye, plus freezing, blurring, and panning physical motion.
Rhythm in Photography — how repeated elements create a visual beat that moves the eye through the frame.
Frequently Asked Questions
What are the 7 elements of photography?
The seven core elements of photography are line, shape, form, texture, pattern, color, and space. Many photographers also include light, depth of field, and perspective as additional essential elements since they play a fundamental role in every image.
What are the 7 principles of photography?
The seven principles of photography are balance, contrast, emphasis, proportion, unity (harmony), rhythm (repetition), and movement. These are the guidelines photographers use to arrange the visual elements into effective compositions.
What is the most important element in photography?
Light is widely considered the most important element. The word photography literally means “drawing with light” in Greek. Without light, no photograph exists. The quality, direction, and color of light determine the mood, depth, and emotional impact of every image you take.
What is the difference between elements and principles of photography?
Elements are the visual building blocks that exist in a scene – line, shape, color, texture, light, space, and so on. Principles are the guidelines for organizing those elements into an effective composition – balance, contrast, emphasis, movement, and others. In simple terms, elements are what you work with, and principles are how you arrange them.
How can I improve my photography composition?
Start by learning the rule of thirds and applying it to every shot until it becomes instinct. Then practice identifying individual elements – like leading lines or patterns – in everyday scenes. Study the work of great photographers, shoot with one principle in mind at a time, and review your images critically. Consistent, intentional practice is the fastest path to better composition.