Framing is a very important tool in photography but many photographers, especially beginners, tend to overlook it.
Using very creative imagination, a photographer can compose the frame properly instead of just pressing the shutter button randomly. The main purpose of taking photos is not just to document moments but also to create art.
Many well-experienced and professional photographers are very good at framing their photos. For inspiration, look at the framing in some of the most famous photographs in history. As a beginner in photography, you can also do it effectively.
But for now, you should learn what framing is and its benefits. Fortunately, this article will teach you everything about framing in photography, as well as some useful tips that you can try.
Table of Content
What Is Framing in Photography?
In a nutshell, framing in photography is when the other parts of the image are blocked to form a frame or boundary within the subject. This technique is similar to placing physical photos inside a picture frame, except that it is done before a photo is taken. The strongest framing happens in-camera, but you can also tighten a frame later by cropping — in fact, most photographers do edit their photos, so good framing and post-processing work hand in hand. In doing so, the photographer decides which parts of the image should be seen in the photo or not.
What Are the Benefits of Framing in Photography?

Contrary to what you might be thinking, framing in photography is not just about framing photos or surrounding a subject with different elements. It’s also about giving your subject a perspective that your viewers will appreciate.
When used properly, framing photos offer a lot benefits more than you can imagine. Here are some of them:
1. Draws More Attention to the Subject
When taking photos, you would want viewers to focus on the subject. Without framing, their eyes will see the entire photo and may not notice your subject the way you want them to.
On the other hand, framing your photo will create a border so your subject can draw more attention to the viewers. People will then notice even the smallest details.
2. Removes Unnecessary Distractions
When preparing to take photos, you may sometimes spot some unnecessary things or scenes that should not be included in your image. If you ignore them, they will be seen in the final output, and viewers will be distracted.
No matter how attractive your subject is, people will not appreciate it. This is also why framing should be done correctly.
3. Add Some Context to Your Image
Pictures tell a story, and framing your photos means that you are adding some context or details to them. The frame will help your viewers understand more about your subject and its location.
Without the frame, the foreground and background in the photo may not be enough to convey the message. In fact, some viewers might even be confused.
4. Gives a Sense of Depth to Your Image
With proper framing, you are giving a sense of depth to your image. The additional layers will guide your viewers to observe closely your subject and can somehow create a three-dimensional appearance of the entire photo.
In effect, viewers will see the art behind the scenery. Your photo will stand out and look very pleasant to the eyes.
5. Makes Your Photos More Compelling
A compelling photo is more than just using an interesting subject. Once viewers spot the subject, their eyes will demand more.
But once you add a frame, it can create more visual interest, and people cannot resist looking at the photo for a longer time. When done correctly, these additional layers to the photo can also create an aesthetic touch.
Types of Framing in Photography
Truth be told, there are no specific rules in framing a photo. This means that you can use anything you like to create a frame. Nevertheless, there are four major techniques to choose from – architecture, geometric shapes, light or shadow, and natural.
To give some ideas, here are some great examples that you can use in framing your photos:
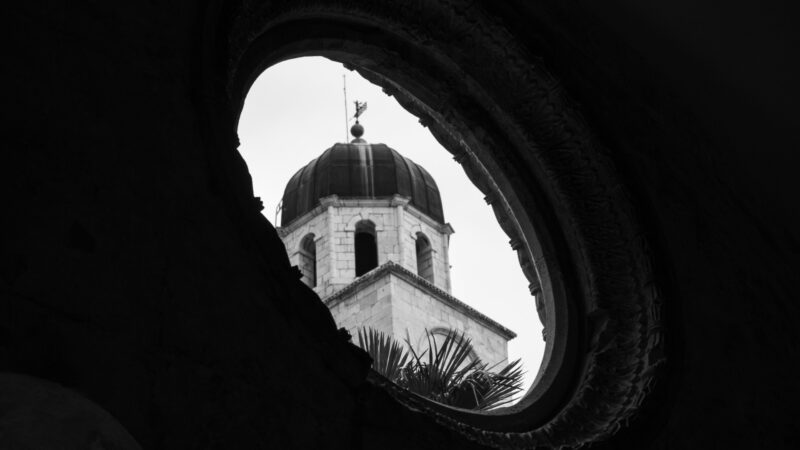
1. Architecture
Architectural elements are the most common frames used in photography. When taking photos outdoors, buildings and skyscrapers are the most obvious.
But then, you can also use other structures such as arches, bridges, fences, and street lights. Indoors, you can use allies, blinds, cabinets, curtains, doorways, hallways, stairs, and window panes.
Interestingly, structures don’t always need to be symmetrical to be a perfect frame. In fact, some artificial constructions are intentionally designed to be asymmetrical to create a more artistic view.
If you are creative enough, any or all of these structures can be ideal for creating a masterpiece without compromising the subject. There are no limits.
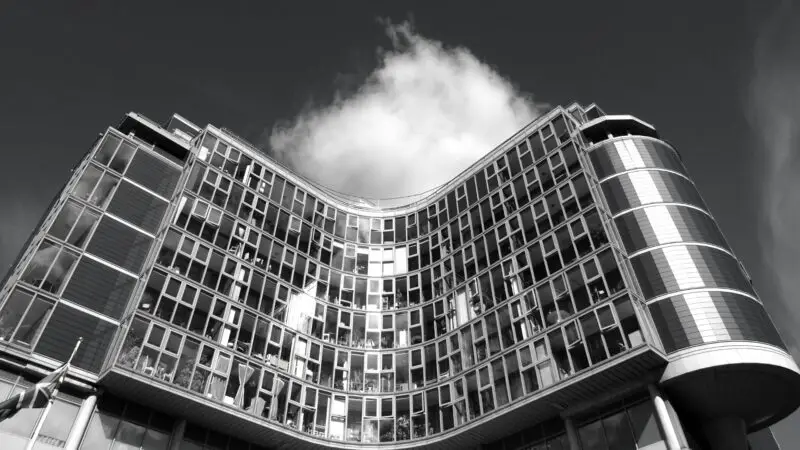
2. Geometric Shapes
Most architectural elements are squares and rectangles, while tunnels are circular. But if there are no compatible structures for your framing, you can also use non-physical geometric figures.
In photography, geometric shapes can create a different atmosphere. Lines and patterns represent emotions and can also be very useful in framing photos.
For instance, squares and rectangles represent conformity and order. Circles represent completion, perfection, and unity. Triangles symbolize forward motion or reversing.
Parallel lines indicate consistency, curved lines show energy, and converging lines create a sense of depth. Patterns, such as tile formations can also add to the drama.
3. Light or Shadow
Frames don’t always need to be physical. In fact, light and shadows are sometimes more effective than structures, although they don’t form the usual shapes for frames.
In photography, the decrease (or fall-off) in the brightness of a picture around its edges is called vignetting. This technique can also be applied during post-production using the software.
In outdoor photography, natural light or lack of light can create a very beautiful frame if you know how to apply it properly.
For indoor photography, try framing your subject with artificial light and using shadows to create the frame. However, make sure that there’s enough contrast. Otherwise, the light and shadows may ruin the beauty of your photo.
4. Natural
In landscape photography, structures and shadows are not always available. But then, you can still use nature to frame your image.
Trees, low-hanging branches, mountains, rock faces, waterfalls, sandstone formations, as well as cave openings are only some examples of natural frames. Observe the surroundings and you will find them.
In street photography, you can also use people as frames for your subject, intentionally or unintentionally. If you only have one subject or model, let him or her stand on the other side of the street while people are passing by.
Here, you should be quick and use a reliable camera and lens. Then, blur the people so viewers can focus on your subject.
Tips for Framing to Get Better Photos
Framing in photography may look easier than you thought, but it’s not. Your subject will not attract attention if you don’t frame your photo properly. So, without further ado, here are some useful tips on how to use framing to get better-looking photos.
Note that you are not required to use all of them. It still depends on how you like to frame your photo.
1. Choose an Interesting Subject
The subject is the most important part of your photo; the frame will just add beauty to it. Your frame will not be effective if your subject is not interesting to look at.
Subjects for photography are not limited to people and animals. In some cases, simple objects or even recognizable things can also be interesting subjects. Don’t be afraid to experiment.
2. Create a Relatable Story
A single photo can convey a message or trigger people’s emotions. Sometimes, it is also more effective than words. While selecting the subject, create a persuasive story in your mind.
Make sure the story is relatable to your target viewers. You can also add some props related to your story. This can help you think about how to frame your photo.
3. Explore the Location
Once you’re sure about your subject and story, choose a location and explore it. Whether it is indoor or outdoor photography, take your time in observing the area.
Again, there are no limits when it comes to choosing a frame. If you really cannot find a suitable frame for your photo, you can also request your model to frame her face using her hands.
4. Get Close to the Foreground
In photography, the foreground is the part of the photo that is nearest to the camera. It is the first element that will grab your viewers’ attention and will lead their eyes to your subject.
If you plan to use the foreground in framing your photo, get closer to it. You can also make the foreground as sharp as the subject if it will help enhance your subject.
5. Use Tonal Contrast Properly
In photography, the contrast has two main types – tonal contrast and color contrast. Tonal contrast is the relationship between the darkest and brightest parts of an image, while color contrast is how the colors interact with each other.
If you plan to use light and shadows as your frame, you should use tonal contrast properly and don’t overdo it.
6. Follow the Rule of Thirds
As the term suggests, the rule of thirds means that the subject is either on the left or right third of the photo and leaving the other two-thirds more open.
This composition technique can also be effective in framing your photo. Although this is not a rule, the subject can be much more visually captivating if it is followed correctly.
7. Have “Enough” Headroom
In photography, the headroom is the distance or space between the top of your frame and the head of your subject. While there is no correct or wrong amount of headroom, “enough” headroom means it should not be too close or too far. Too little headroom looks awkward to the viewers, while too much headroom leaves some dead space.
8. Decide Whether to Focus the Frame or Not
While blurring the frame can help in driving the attention of the viewers to the subject, it is not always the case. On the other hand, focusing on the frame can also help the viewers understand more about the subject.
If you want to blur the frame, you should use a large aperture. But if prefer focusing the frame, you should choose a narrow aperture.
9. Use the Smallest Thumbnail to Preview Your Photos
A thumbnail is a smaller representation of the actual size of a photo. The size is almost as small as a human thumbnail, hence the name.
Once a photo is posted online, the thumbnails will give the viewers an idea about the photo. If you look at the smallest thumbnail of your photo, you can easily check whether your frame is effective or not.
10. Use Frame Within a Frame
In photography, using a frame within a frame has the same goals and benefits as framing your photos. In this compositional technique, the first frame is the outer frame, and the second frame is the inner frame and is closer to the subject.
You can use repeating frames or add another frame as long as they can add depth to your image.
Related: How to Make a Good Composition in Photography? | A Complete Guide